Basecamp SOLO Tent
Free U.S. Shipping
All orders over $100 get Free Shipping to the lower 48 states!
30 Day Returns
Keep what you like. Send back what you don't. Returnable in original condition within 30 days.
Best Price Gauranteed
Find a better price up to 7 days after your purchase and we'll match it.
Giving Back
Part of our profits go towards restoring our National Parks, local Ranchs / Farms, and to keep America beautiful for future generations.
Rooted in Tradition
From our family's adventurous spirit since 1630 to your doorstep, every purchase is backed by centuries of trust and tradition.
Description
Discover the ultimate in solo camping with the Overland(ish) BaseCamp Solo tent. Compact, lightweight, and easy to transport, this tent is your all-season outdoor companion. Featuring triple-layer insulation for temperature control, quick setup, and a spacious 45 sq/ft interior with a 6'4" ceiling, comfort meets convenience in the wilderness. Durable, water-resistant, and designed to fit in any vehicle, the BaseCamp Solo is the perfect retreat for adventurers seeking a blend of ease and reliability in their outdoor escapades.
Tech Specs
DIMENSIONS: 80" x 80"
INTERIOR HEIGHT: 6' 4"
FLOOR SPACE - 45 sq.ft.
PACKED DOWN LENGTH: 4' 6''
WEIGHT: 30 lbs
AC / Heater Ports: Qty x 2
AC / Heater Port Size: 4"
What is included with your Basecamp Shelter -
- (1) Basecamp SOLO Shelter (floor will be attached to your shelter half zipped)
- (1) Hanging pocket
- (1) HD Overland(ish) cinch straps
- (4) screw stakes
- (4) lengths of paracord
If you purchased the Weather Pack it will include -
- (1) Rainfly
- (1) Footprint
- (4) screw stakes
- (4) lengths of paracord
If you purchased a Tough Bag it will include
- (1) Your Tough Bag
FAQ / Set Up
So you just got your first Overland(ISH) Shelter
Now its time to unbox and set it up, so follow these instructions to make sure you received what you were supposed to and you know how to use it all!
Overland(ISH) Basecamp - SOLO
What is included with your Basecamp Shelter -
- (1) Basecamp SOLO Shelter (floor will be attached to your shelter half zipped)
- (1) Hanging pocket
- (1) HD Overland(ish) cinch straps
- (4) screw stakes
- (4) lengths of paracord
If you purchased the Weather Pack it will include -
- (1) Rainfly
- (1) Footprint
- (4) screw stakes
- (4) lengths of paracord
If you purchased a Tough Bag it will include
- (1) Your Tough Bag
Let's Get Started
Upon receiving your Overland(ISH) Basecamp Shelter, please start by removing everything from its packaging and taking note that you have all the items.
Now it's time to set up your shelter for the first time.
It's best not to open your shelter on cement or asphalt. A grassy open space or in your home on a slick surface or carpeting works great. For a first time setup and inspection, the footprint is not necessary.
If you purchased the Weather Pack, pull out the footprint and lay that out now. Next, grab your Basecamp and bring it to the center of your footprint (if being used) with the hubs touching the center of the footprint.
Lay your shelter on its side with the hub in the center of your footprint and remove the strap. Unfold your shelter gently and make sure you take note of the inside versus the outside material. The poles are on the inside of the shelter, and all of the logos are on the outside. Take care to not open the shelter inside out. We are not responsible for any damages caused by incorrectly opening the shelter.
DO NOT DEPLOY THE SHELTER INSIDE OUT
Your floor will be half zipped in but attached, so be careful about pulling any loose material, as you might accidentally damage a zipper. Complete the unfolding of the Basecamp so that the roof is parallel to the ground. Now walk around the shelter, and one by one, grab the center pull strap attached to the eyelets for each wall, pulling out each wall until they pop into place. Once they are all set up, step inside and push the hub on the roof up until it pops into place - and that's it! Now it's time to start making your shelter a home!
Now since this is the first time you're opening your new Basecamp Shelter, let's just make sure everything is A-OK. Inspect it all now before you take it out into the wild. Remember when pulling your shelter out of the box that the floor is half zipped so don't go tugging on some random piece of material - this could damage a zipper. Once your shelter is deployed, walk around the outside, making sure that all the eyelets are nice and snug. If there are any loose eyelets, now is a good time to tighten them up.
The zippers on your new shelter might start out a little difficult to pull, due to tension in the fabric. This is normal, and as the material breaks in like your favorite pair of jeans, the zippers will become easier to pull. These are high quality YKK zippers, they can handle it!
How to deploy your Rainfly
- Find your Weather Pack and remove your Rainfly. Making sure the logos are facing the sky, throw it over the roof of your Basecamp Shelter. If you need to, you can always drop the roof from the inside of the shelter as it may make it easier for you. (Note that under each wing of your rainfly there is a loop for ease of setup for one person in adverse weather conditions).
- Once you have the Rainfly lined up so that the roof vents are in line with each other, walk around your shelter attaching the straps under the wings of the Rainfly to each of the eyelets on the exterior walls. Once you have all sides connected, use your included screw stakes and guy lines to secure the fly to the ground. Start by removing your first Rainfly wing from the eyelet and with the stake/guyline set, pull the wing of the shelter as far from that shelter as possible. This is important, as the farther you pull it out the more ventilation you get. It can be set up as close or far as you like, there is no “correct” distance. Finish by walking around your shelter securing each wing (try to keep the distances from the shelter as uniform as possible - because we all like a good looking campsite, of course!)
Basecamp Shelter for different weather conditions
Your Basecamp Shelter has a few alternate ways to be set up based on different weather conditions.
When it's hot out -
- Add a portable AC unit for optimal cooling on hot days and don't let mother nature dictate your comfort. Here you would just seal up your shelter and push that AC, find what the lowest setting on your unit is that still cools your space so you can conserve that power…if power isn't an issue then blast that thing!
- What if it's super hot and you want to take advantage of all of the ventilation the Basecamp has to offer without the whole campsite seeing into your shelter? Easy, just use your Rainfly and remember to pull it as far from the Basecamp as you can. This allows you to have open windows and ventilation so you can take advantage of any little breeze mother nature throws at you, safe from outside view.
When its cold out -
- Depending on how you choose to heat your shelter there are a few ways to set yourself up.
- We recommend a diesel heater as this produces a dry heat perfect to control condensation, especially when paired with the ventilation and condensation control ports on the roof.
- If you want to use a propane heater, you just need to make sure to vent properly or it could be dangerous, as propane heaters produce CO2. If you choose this route, make sure to use proper safety meter devices with alarms.
- If you're going out with no heater and relying simply on body heat just remember, it's a big space so make sure to bring ALL your friends! But in all seriousness, a single person will raise the internal temp of a Basecamp 7-10 degrees, so the more bodies you add the warmer it gets.
When it’s wet and rainy out -
- Setting up correctly for the rain is important and easy. First, decide if you need to use a footprint - if the ground is already wet, then the answer is YES. If the ground is dry but you know it's going to rain later you don't necessarily need the footprint, but this is left up to your own judgment.
- Once your Footprint is set up, deploy your Basecamp. Next roll your footprint at each side of your shelter and tuck it under the skirt, placing the rolled material under the shelter but in the little void on the inner side of the wall. When you get to the landing pad part of the footprint, fold it in half and in half again and then roll and be sure to stuff that material nicely. Lastly, go around the shelter and tuck the attached skirt under the shelter as well, leaving no place for water to accumulate.
- Once you've rolled and tucked that footprint, set up the Rainfly included in the Weather Pack - remember to stake down those wings as far from the shelter as space allows, as the more water you sheet away from the shelter, the better. A little tip is that you can use one stake for both the wall and the fly, just make sure wind conditions aren't high, as this will put double the strain on that stake.
- At this point you're ready for the wet stuff, you can now use your windows even during full rain to take full advantage of all of your Basecamp’s ventilation.
When it’s windy out -
- The Basecamp is a fortress of a shelter, with the extra tension engineered into the walls of the Basecamp we have field tested it in all wind conditions.
- If you don't feel like staking it down, which in most cases is fine, our Basecamp has been tested to around 25 mph gusts.
- Planning on getting hit by high winds? Make sure to stake your shelter down properly, Use your included screw stakes and paracord to tie down to the steel eyelet at the center of each wall. Tie off and come down at a 45 degree angle making sure your stake is secured and strong, and you are now ready to withstand wind speeds of over 80 mph. Remember, for high winds use separate stakes for your shelter and your rainfly.
Now that you're done with your preferred setup, decorate and enjoy!
Happy Camping!
Warranty
Limited Warranty: Overland(ish) branded products covered by this warranty are warranted to the original owner against manufacturing defects in materials and workmanship for 1 year. This warranty applies to all Overland(ish) branded products except product marked as not covered by warranty on the product’s packaging, hangtag and/or label, and product purchased from an unauthorized dealer or seller.
If your product covered by this warranty fails due to a manufacturing defect, we will repair it without charge, or replace it, at our discretion. Only original, unaltered and unmodified items and workmanship are covered. This warranty does not cover damage caused by accident, improper care, negligence, normal wear and tear, or the natural breakdown of colors and materials over extended time and use.
The products eligible for the limited warranty are covered to the original owner, for the period specified above.
About the Brand
Sackett Ranch is excited to feature Overland-ish, a brand that lives and breathes the overlanding adventure lifestyle. With a cheeky nod to the quirks of overlanding—like gourmet coffee rituals and elaborate camp setups—Overland-ish embodies the heart of exploration. They offer a mix of humor-filled content and practical gear, from essential camping accessories to the best built hub ground tents we have come across.
Overland-ish doesn't just talk the talk; they walk the walk, testing their gear across challenging terrains and documenting their journeys to inspire the community. They're here to enhance your adventures, whether through innovative products or laughter-filled tales from the trail. Join us and Overland-ish in embracing the great outdoors and making every journey memorable.
Compact and Lightweight Design
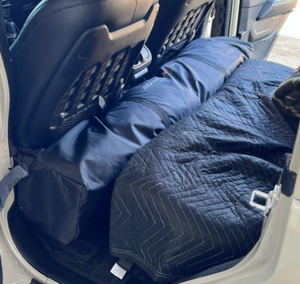
Experience the ease of travel with the Overland(ish) Base Camp Solo tent. Its innovative design folds down to just 4'7" and weighs a mere 30lbs, making it effortless to pack in any vehicle. Perfect for the adventurer who values space-saving solutions without compromising on comfort. This tent redefines what it means to travel light and easy.
All-Season Reliability
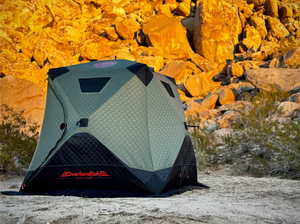
Brave the elements in any season with the Base Camp Solo's triple-layer insulation. Designed to keep you warm in the cold and cool in the heat, this tent also boasts water-resistant and wind-resistant capabilities when properly staked. Its all-season functionality makes it an ideal companion for year-round explorations.

Easy Setup and Maintenance
Spend less time setting up and more time enjoying nature. The Base Camp Solo can be pitched in minutes, thanks to its tension beam internal structure. The added convenience of an un-zip floor simplifies cleaning, ensuring your focus remains on your outdoor experience.
Stay Warm, Or Cool
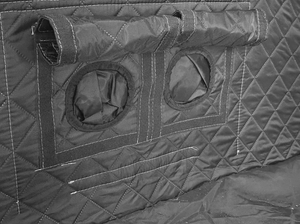
A first for this style of tent, the Basecamp comes standard with dual 4" multipurpose wall ports. These can be used for electrical cords as well as AC and Heater intake / exhaust ports, allowing you to safely run diesel heaters and AC units for your tent, ensuring that no matter how hot or cold it is outside, the inside of your tent stays the perfect temperature for you and your family.

Versatile and Durable Features
The Base Camp Solo is packed with features to enhance your camping adventure. It includes a wire management system for lighting, multi-purpose wall ports, and a robust, thick floor. With reinforced corners and high-quality YKK zippers, durability meets functionality in this thoughtfully designed shelter.

Spacious Interior with Customizable Options
Offering 45 sq/ft of interior space and a 6’4” standing height, this tent provides ample room whether you're camping solo or with a companion. Customize your experience with removable window panels, bug-mesh doors, and optional weather packs. Choose from a selection of colors to match your style while enjoying the ultimate comfort of your outdoor home.
Windows to the Outdoors
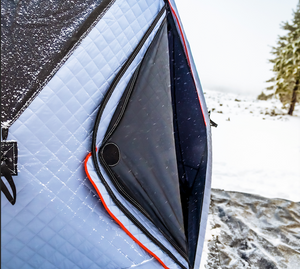
Equipped with four windows that feature both clear and mesh panels, which are both fully removeable. Also features two doors on opposite sides of the tent, which provide easy access for both you and your loved ones to come and go as you please without having to step over one another. Both sides feature both mesh and weatherproof doors, maximizing your views of nature around you while in your humble abode.
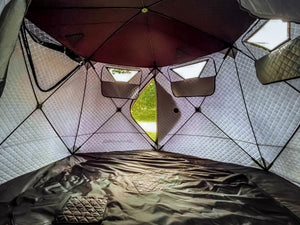
Removable Floor
The thick, and highly durable floor, is able to un-zip from the tent, making cleaning easier and faster.
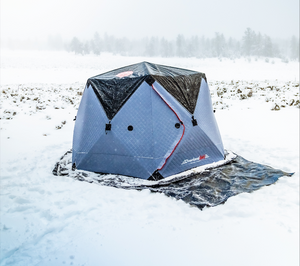
Upgrade Your Experience
We also offer the Weather Pack (Rainfly & Footprint) as an optional upgrade. Add these items to your Base Camp Solo order to make sure you're even more prepared for the most severe weather.


